Creating Journeys and Steps
Journey Definitions
What are Journey Definitions?
Journey definitions are journeys templates that define the steps an asset goes through. Think of them as a checklist or process map.
Access: NAO Flow > Journey Definitions
Creating a Journey
Step 1: Create Journey
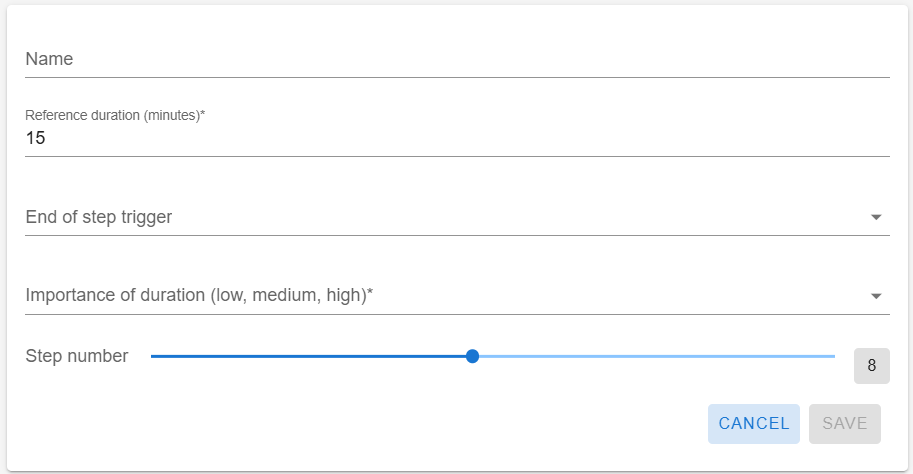
1. Click the red + button
2. Enter a name (e.g., "Patient Admission Process")
3. Add a description (optional)
4. Check "Active" to enable the journey
5. Click Save
Step 2: Add Steps
1. Click Steps button on your journey card
2. Click the red + button
- End Trigger: Select the zone whose geonotification will trigger step completion
4. Click Save

Each step must be linked to the correct zone. The end trigger is the geonotification associated with that zone. If you mismatch zones and steps, triggers won't work and the journey will malfunction.
Example:
- Zone 1 → Step 1
- Zone 2 → Step 2
- Zone 3 → Step 3
Each step completes when the asset enters its corresponding zone.
Step 3: Repeat for All Steps
Add all steps in your journey, numbering them in order.
Managing Journeys
View Journeys
Card View: See journeys as visual cards (default)
Table View: See journeys in a list - drag to reorder
Edit a Journey
1. Click Edit button on the journey card
2. Update name, description, or active status
3. Click Save
Delete a Journey
1. Click Delete button on the journey card
2. Confirm deletion
3. Note: Can only delete if no active tracking
Managing Steps
View Steps
1. Click Steps button on a journey card
2. See all steps for that journey
Reorder Steps
1. Switch to table view
2. Drag a step by the drag icon
3. Drop it on another step to swap positions
Edit a Step
1. Click Edit button on the step
2. Update details
3. Click Save
Delete a Step
1. Click Delete button on the step
2. Confirm deletion
Best Practices
Journey Design
- Keep journeys simple (5-10 steps is ideal)
- Use clear, descriptive names
- Set realistic time expectations
- Test with one asset before full rollout
Step Setup
- Number steps in logical order
- Set expected times based on actual data
- Use consistent naming across journeys
- Document what triggers each step
Tips
- Start with simple journeys and add complexity later
- Review and update expected times regularly
- Get feedback from staff who use the journeys
- Keep journey names short for easier reading
Common Questions
How many steps can I add?
As many as needed, but 5-10 is recommended for clarity.
Can I change step order?
Yes, use table view to drag and reorder steps.
What if I delete a step by mistake?
You'll need to recreate it - there's no undo.
Can I copy a journey?
Not currently - you'll need to create a new one manually.
Related Articles
Tag Asset Association
Overview Link physical tags to journey workflows to start tracking. This creates a journey instance and assigns properties to the tag. This page links a tag with a journey, creating a connection between the journey's steps, geofences, ...Tag Asset Dissociation
Overview Remove all properties from a tag and its associated journey. This resets the tag for reuse when a journey is complete or needs to be cancelled. Access: NAO Flow > Tag Asset Dissociation URL: `/applications/{application_id}/tag_dissociation` ...Journey Tracking
Overview Monitor all active workflows in real-time. See which assets are in progress, completed, or delayed. Access: NAO Flow > Journey Tracking Understanding the Display The Table Each row shows one workflow with its steps displayed from left to ...Filter rules
Overview Filter rules are the building blocks of saved filters in NAO Viewer. They define specific criteria for matching assets based on property values and comparison operators. Access: Applications > [Your Application] > Filters menu (left ...Saved filters
Overview The Filters page allows you to create, manage, and organize saved filter combinations for quick access throughout the application. Saved filters help you quickly find specific groups of trackables based on property values. Access: ...